Invoices
The invoices tab shows you all your unpaid invoices, quotes and drafts. Please visit your Invoice tab if you'd like to create a new invoice or edit an existing invoice.
The Invoices tab is only visible in Invoicing mode.
Invoice Stages
Invoices have a flow that allows a merchant to run through a standard invoice process.
An invoice can be transitioned through the following stages:
- Draft
- Quoted
- Accepted
- Unpaid
- Overdue
The flow of stages is described in the diagram below, but most stages can be skipped over. For example, a Draft can move directly to the Unpaid stage if a partial payment is made.
graph LR
  A(Draft) --> |Send quote| B(Quote);
  B --> |Cancel| A;
  B --> |Accept quote| C(Accepted);
  C --> |Issue invoice| D(Unpaid);
  D --> |Date due | E(Overdue);
  E --> |Full payment| F(Paid);
The Invoice tab shows how many invoices you have in each of the 5 states. You can filter to show invoices from that state by selecting the state at the top of the screen. You can clear a filter by reselecting it, or tapping on the All filter.
You can also search through invoices by using the search input. You can find any paid invoices on the Paid tab.
Partial Payments
In Retail & Invoicing mode, any partial sales will be stored here as unpaid invoices instead of in the paid tab.
New Invoice
To create an invoice, simply tap the New Sale button at the top right of the page (for iOS) or the + button at the bottom right of the screen (for Android). New invoices will begin in a draft state.
The invoice view is very similar to the Register. The initial view will display the invoice details (almost identical to the Register basket), which allows you to set an invoice title, add notes, and edit any existing line-items.
Most importantly, you can add new line-items to the invoice by selecting Add Items. This will display the Add Items screen, which operates exactly the same as the Register. Please see that section for more information on adding items to your invoice.
Once you've created your invoice, you can choose to leave the invoice in Draft, or you can perform an invoice action as described below.
Adding Customers to Invoices
To add a customer to an invoice, simply open an invoice and tap on the Add Customer button. From there, a customer can be selected by tapping on their name.
Any communications regarding the invoice will be sent to the customer's nominated contact (email address or SMS).
Invoice Actions
Invoices have several actions that can be performed on them, and some actions can only be performed from certain states.
| Action | Description |
|---|---|
| Accept | This accepts a quote and moves it to the Accepted state. Only available in the Quote state. |
| Share | This allows you to share the invoice in its current state with a customer. |
| Cancel | This cancels a quote and returns it to the Draft state. It is the only time an invoice can move backwards. Only available in the Quote state. |
| Void | This effectively invalidates the invoice, but will keep a copy for your records. The copy will be stored in the Paid tab. Void is only available if no payments have been made against an invoice. |
| Delete | This deletes the invoice entirely. No record will be kept. It is only available in the Draft state. |
| Quote | This moves the invoice to the Quote state and will send the quote to a customer. |
| Issue | This moves the invoice to the Unpaid state and will send the invoice to a customer. |
| Pay | This allows you to make a payment against the invoice. You can either make a full or partial (split) payment. If you make a partial payment, the invoice will move to the Unpaid state. Otherwise, it will move to the Paid state. |
Sending Invoices
Invoices, quotes and sales can be sent to customers. There are multiple methods of initiating this process:
- Opening a quote, tapping on Share.
- Opening an invoice, tapping on Share.
- Completing a sale, tapping on Send Invoice.

This screen shows a preview of the shared invoice, with any existing recipients and customer information. You can add a recipient by searching for a customers name, email, or phone number in your EFTPOS Air contacts.
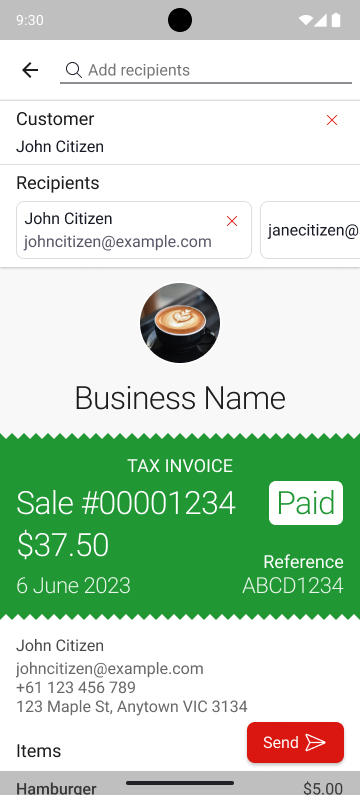
When adding a receipient, tap the (email) or (SMS) icons to determine how the invoice will be delivered to the customer. If there is no customer assigned to the invoice, then you can assign a new customer by tapping the (add customer) icon.
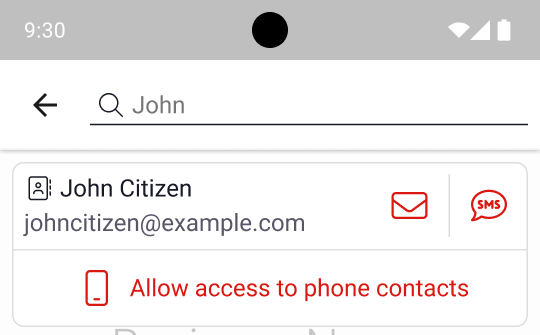
To include your phone contacts in search, select Allow access to phone contacts when sending an invoice/receipt.
Visit https://www.westpac.com.au/merchant-terms/ and https://www.westpac.com.au/privacy/ to know how we handle your personal information and protect your privacy.